Using the Airtable API with Eleventy Collections
- Introduction
- Setting Up Airtable
- Setting up Eleventy
- Netlify Environment Variables
- Conclusion
- Footnotes
Introduction
When building my reading page, I set out to create a system which allows me to track the books I’m currently reading or have read previously. I wanted to do so in a way that felt relatively frictionless and I decided upon using the Airtable API in combination with Eleventy nunjucks templating. This approach leverages the power of templates and data sources on the back end and a visually appealing database for data entry on the front end. This post details the code and small details necessary to create a similar system on an Eleventy site of your own.
The final product looks like the following, which is a screenshot from late January 2023 of my reading page:

Fig 1: My reading list built with Eleventy and Airtable
Each of these links takes the reader to an individual page with more metadata and my personal review, all pulled from Airtable (paginating this data is, however, outside the scope of this post):
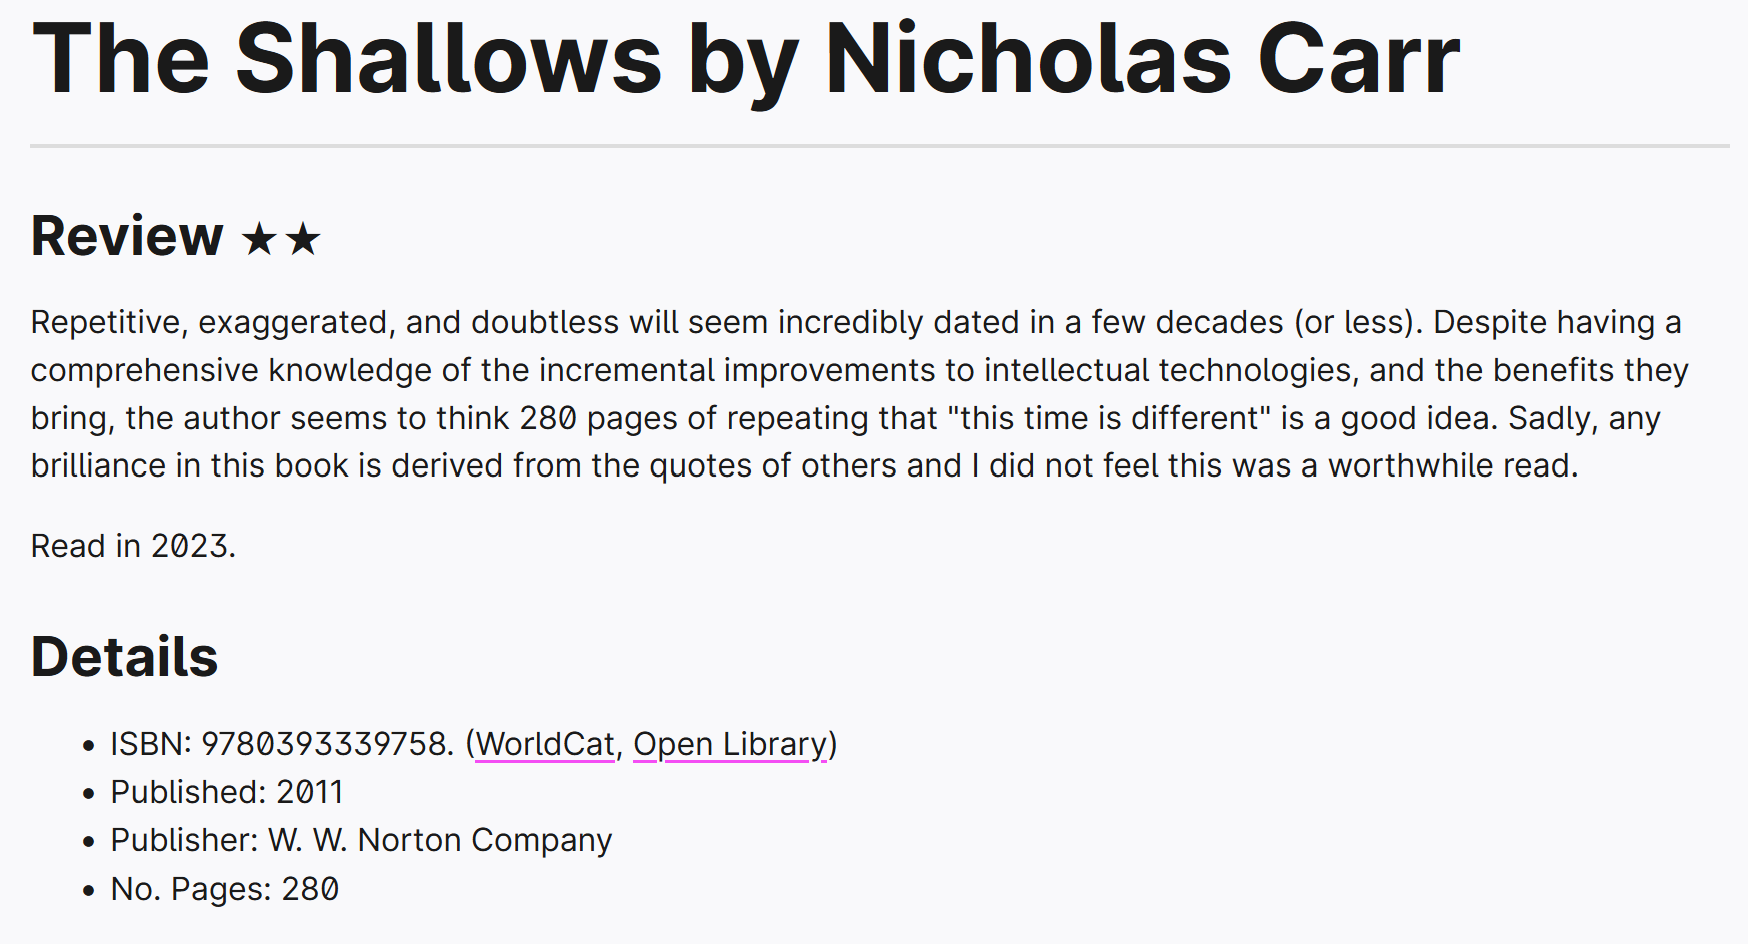
Fig 2: Example of paginated data using templates
This data is entered in an Airtable database which looks like the following:
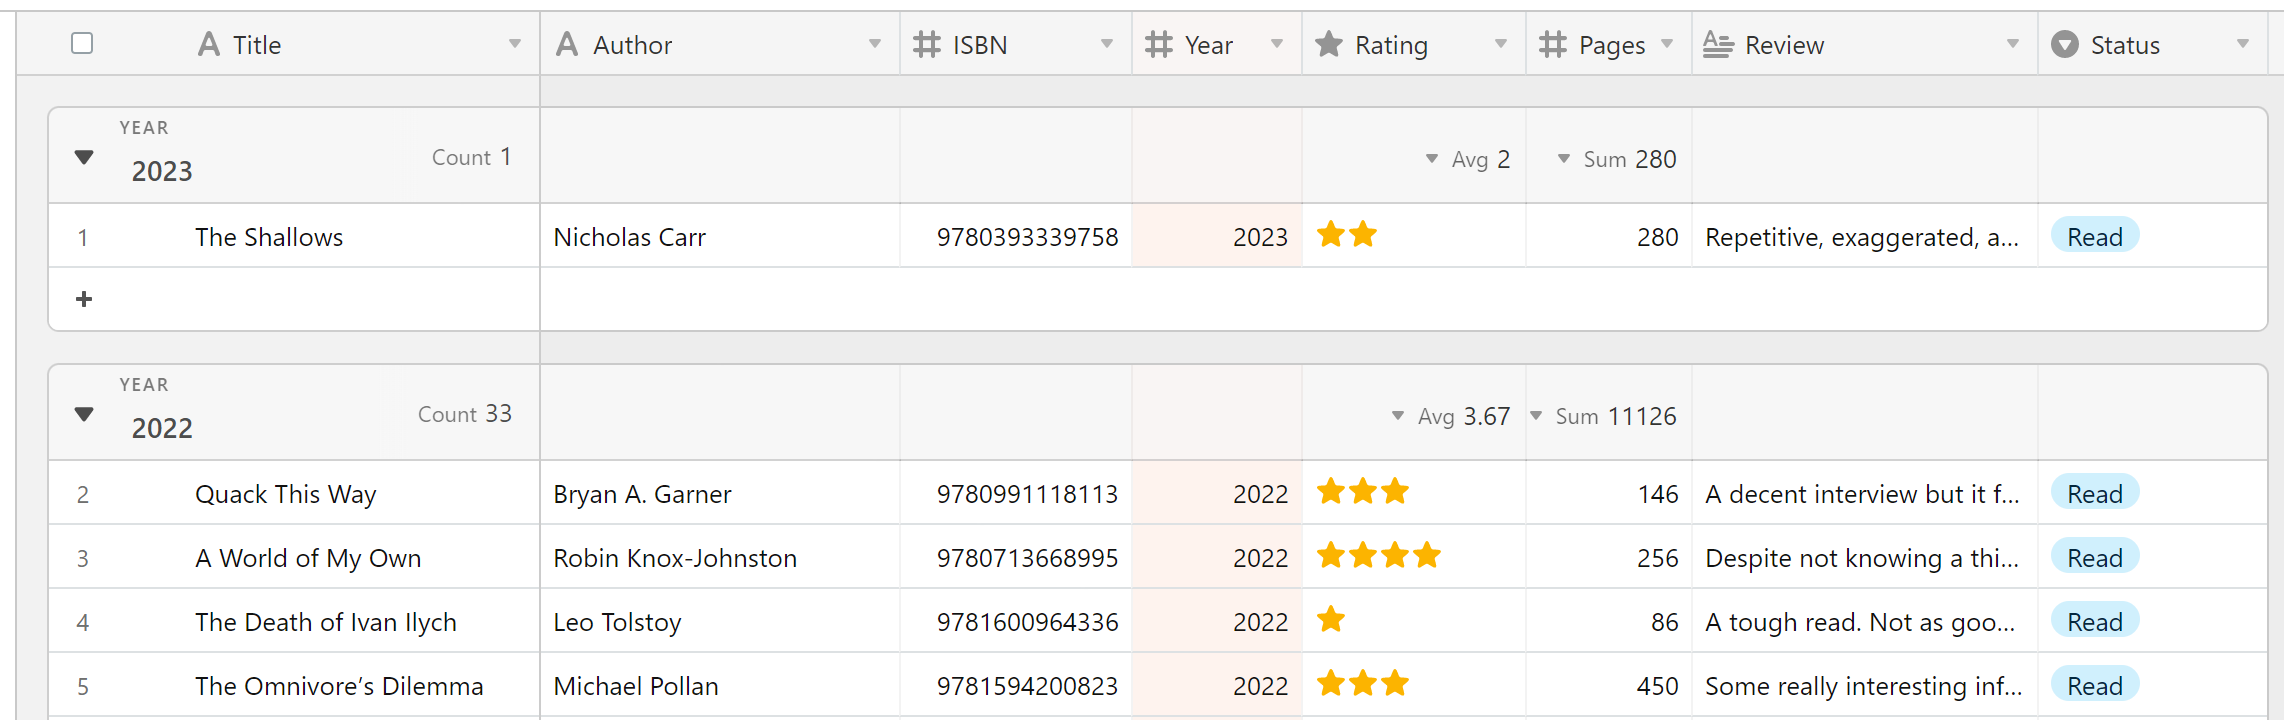
Fig 3: Example Airtable interface
The next sections will walk through the details and code requirements for setting this system up. This post is written with the assumption you currently have a site set up with Eleventy, so please ensure you have the repository open in your code editor of choice before starting.
Setting Up Airtable
Before we begin this stage of the process, please note that Airtable have very recently (19th Jan 2023) announced that API keys will be deprecated by the end of January 2024, meaning a personal access token is required. This is a small change to the process but worth keeping in mind in case you are currently relying on the standard API keys to access the Airtable API. It is certainly advisable to follow this guide and creating your own personal access tokens ASAP, to prevent breaking changes for your setup in the future.
Create Book Database
After creating an account, head to the main page and add a new base called ‘Reading’. There is no need to start with a template, from scratch is fine here. Rename the default table from ‘Table 1’ to ‘Library’ and the default view from ‘Grid view’ to ‘Database’. After doing this, it is time to set up the fields. As you can see in the image below, I use the following fields:

Fig 4: The fields I use in Airtable
The field names and types are tabulated below for reference:
| Field Name | Field Type |
|---|---|
| Title | Single line text |
| Author | Single line text |
| ISBN | Number (integer) |
| Year | Number (integer) |
| Rating | Rating |
| Pages | Number (integer) |
| Review | Long text |
| Status | Single select |
Note: Feel free to add or remove these fields as you see fit, however bear in mind any changes to these field names will affect how you set up templating in Eleventy later on.
Go ahead and fill out the database with the details of your books however you like; I exported my Goodreads data to CSV and imported the formatted data directly into Airtable which I found worked quite well.
Personal Access Token
Now you need to create a new personal access token to allow access to the Airtable API. The new access token screen should look like this:

Fig 5: Airtable access token creation page
The following elements should be completed:
- Name: Create a name that describes the function of the token e.g. Eleventy Reading Page
- Scopes: For read-only access (e.g. one-way data from Airtable to Eleventy), use the following scopes:
- data.records:read: See the data in records
- schema.bases:read: See the structure of a base, like table names or field types
- Access: Select the Airtable base you just set up, named ‘Reading’
Airtable will now provide you with a personal access token, this is only shown once so be sure to properly copy it as we will need it for the next step.
Creating a Dotenv File
After copying your Airtable access token in the previous step, head to your code editor and create a file in the root repository with the filename .env i.e. a file with the .env extension and no name. In this file, write the following line:
// .env

AIRTABLE = 'YOUR_TOKEN_HERE' // Replace the value with the Airtable token you created
Now open the .gitignore file of your repository (or create one if it does not exist) and add a new line with .env, to ensure this token data is not uploaded to GitHub[1]. A snippet of my .gitignore file is shown below for additional clarity:
// .gitignore

.netlify
.DS_Store
.env
Setting up Eleventy
Installing Packages from NPM
Before we can create the collection in Eleventy, we require installation of two packages from the node package manager, or npm. These are the dotenv package, which prevents the sensitive Airtable access token from being publicly exposed (which utilises the .env file we just created) and Airtable.js, the official Airtable JavaScript library. Install these packages by running the following command:
npm i dotenv airtable We are now ready to write the JavaScript file which will create the collection of Airtable data in Eleventy.
Creating the collection
In order to create the collection in Eleventy, we will create a file in the global data folder, _data[2]. Name this file reading.js and paste the following code in. Note that you must substitute your own base URL in where noted:
// _data/reading.js

require('dotenv').config();
const Airtable = require('airtable');
const base = new Airtable({ apiKey: process.env.AIRTABLE }).base('BASE_URL');

module.exports = async () => {
    try {
        let airtableData = [];
        const baseName = 'Library';
        const viewName = 'Database';
        const records = await base(baseName).select({ view: viewName }).all();
        airtableData = records.map(record => ({ customId: record._rawJson.id, ...record._rawJson.fields }));
        return airtableData;
    } catch (err) {
        throw new Error(err);
    }
};
The rest of this code has been pre-filled with the base and view name as outlined earlier in the post, so if you decide to customise either of these names in Airtable please remember these variable names will need to change also.
Creating Templates
This step is where your project may deviate from mine—this is up to personal preference. I will, however, run through how I use Nunjucks to display the information, as there are a few key elements which will apply to most projects.
Below is the code I use in one section of my reading page:
<div class="library">
{%- for book in reading -%}
{% if book.Year == "2023" %}
<div></div>
<div></div>
<div></div>
{% endif %}
{%- endfor -%}
</div>The code {%- for book in reading -%} is one of the most important lines here. This line calls for objects in the reading collection, which is the one we just created. It also refers to each of these objects as a book—essentially referencing a single line of the database we created in Airtable. Feel free to change the reference of book here, but remember the critical element here is to refer to the reading collection. If you want to change this collection name, simply change the filename of the JavaScript file in the _data folder to match.
{% if book.Year == "2023" %} is optional code I left in, to demonstrate how you can use an IF function to filter for certain conditions. Another example would be to filter by status e.g. {% if book.Status == "Reading" %}. Just remember to close out this function using {% endif %}.
The last interesting part of this code is the {{ '★'.repeat(book.Rating) }}, this is some JavaScript code which will replace the rating of 1 to 5 from the Rating field of Airtable with the same number of unicode stars. I find this useful for improving the display of the collection in Eleventy while retaining the functionality of the Rating field in Airtable.
Netlify Environment Variables
I know many people using Eleventy (or similar JAMStack setups) build their sites with Netlify. In creating a dotenv file, you will have successfully set up access to the Airtable API but only locally; when Netlify builds your site it is unable to access this dotenv file. This is, in fact, working correctly and is the point of using the dotenv library to manage sensitive/private environment variables. Thankfully, Netlify makes adding an environment variable very straightforward: simply follow the below steps to add an environment variable to your site that Netlify can read:
- Visit your netlify overview
- Click the relevant site and choose ‘Site settings’, followed by ‘Environment variables’
- Click the ‘Add a variable’ button
- In ‘Key’ enter the name of your Airtable variable. In this post we used AIRTABLE
- Scopes and Values can remain as ‘All scopes’ and ‘Same value for all deploy contexts’ respectively, unless you have a specific reason for changing them
- Click ‘Create variable’
Conclusion
I hope this post has assisted with the process of integrating your Airtable database with your Eleventy blog. I think this integration is a really powerful one given the robust database capabilities of Airtable and the flexible, dynamic templating of Eleventy.
If you have any questions about the process, feel free to get in touch at contact@willdarwin.com
Footnotes
- ^ For more information on the gitignore file, visit the Git documentation.
- ^ Most Eleventy users should be familiar with this folder, feel free to visit the Eleventy documentation if you would like to learn more before continuing.